

How to whitelist Advanced EPDR for Mac system/kernel extensions using Jamf Pro 10.x
Related Products_
- Advanced EPDR
- Advanced EDR
Introduction
After installing Advanced EDR/EPDR for Mac manually or remotely, the user is prompted to approve the Advanced EDR/EPDR kernel/system extension on his Mac and the FDA (Full Disk Access) on this example with Catalina 10.15.
Until the user approves this kernel/system extension and FDA (in Catalina or higher), the protection will not work.
You can pre-approve the Advanced EDR/EPDR kernel/system extension and FDA and thus eliminate user intervention by whitelisting the kernel/system extension using a Mobile Device Management tool such as Jamf Pro. This feature is supported starting with macOS 10.13.2 and Jamf Pro version 10.28.0.
Procedure
The procedure implies creating and applying an MDM configuration profile in Jamf Pro 10.28.x that whitelists the kernel/system extension and FDA to the target computers. Please note that the computers must have the User Approved MDM status.
-
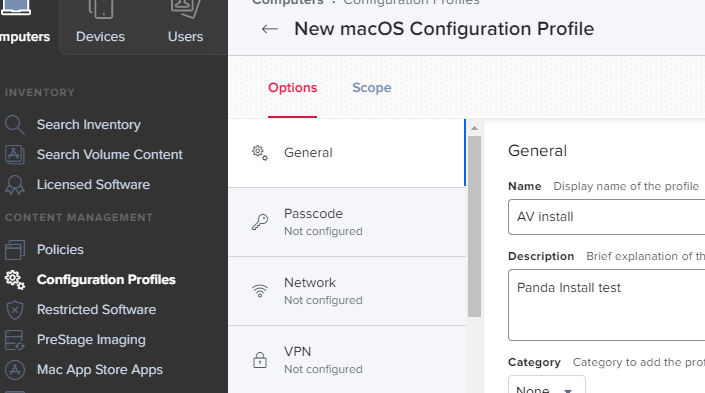
- Click on the Configuration profiles on the left side menu and fill in the required information under General.
- Scroll down under Configuration Profiles option and select Privacy Preferences Policy Control, This will require to enter the Team Identifier and Bundle ID. Use the terminal command below to access the required information:
- codesign -dr – /Applications/Management-Agent.app for Management Agent
Output:
Executable=/Applications/Management-Agent.app/Contents/MacOS/AgentSvc
designated => identifier ManagementAgent and anchor apple generic and certificate 1[field.1.2.840.113635.100.6.2.6] /* exists */ and certificate leaf[field.1.2.840.113635.100.6.1.13] /* exists */ and certificate leaf[subject.OU] = D3U2N4A6J7 - codesign -dr – /Applications/Endpoint-Protection.app for the protection.
Output:
Executable=/Applications/Endpoint-Protection.app/Contents/MacOS/pa_gui
designated => identifier “com.protection.agent” and anchor apple generic and certificate 1[field.1.2.840.113635.100.6.2.6] /* exists */ and certificate leaf[field.1.2.840.113635.100.6.1.13] /* exists */ and certificate leaf[subject.OU] = D3U2N4A6J7
Example below: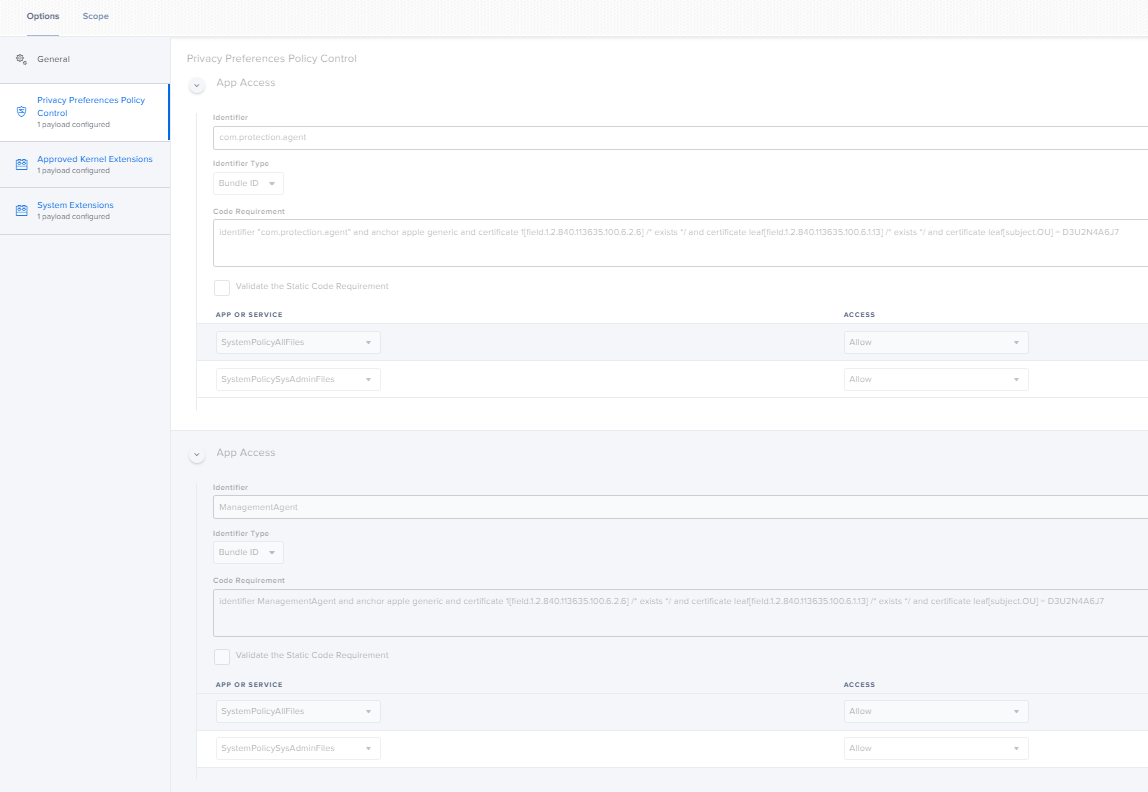
- codesign -dr – /Applications/Management-Agent.app for Management Agent
- For the next step, click on the Approved Kernel Extensions, the name of the kernel extension is needed for systems Catalina and older OSX systems. In order to gather the name of the kernel extension, the following terminal command can be used
- kextstat | grep -v com.apple
This will show all third party kernel extensions installed. The kernel extension will usually look like protection_agent.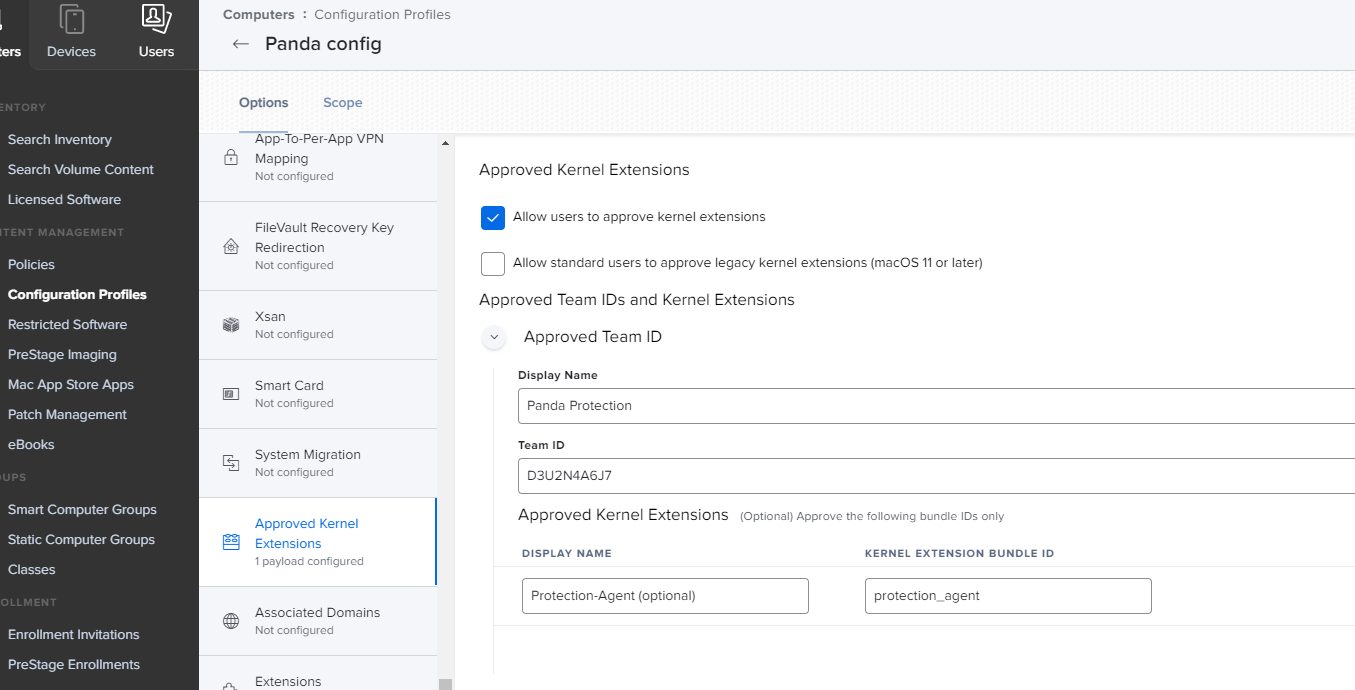
- kextstat | grep -v com.apple
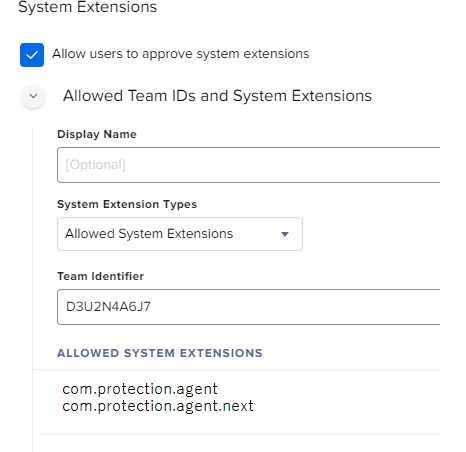
- In the case of OS 10.15 and later, click on Extensions under the Configuration Profiles menu and like previous process, add the system extensions. This process offers three different options for the system extension approval. You can choose Allowed System Extensions and fill the required information. You can use the following command to access theTeam Identifier and system extension on a system with the protection already installed. The terminal command is as follows:
- systemextensionsctl listonce
- Click on the Configuration profiles on the left side menu and fill in the required information under General.
Once you have the information, fill in the required boxes with com.protection.agent.next and com.protection.agent like in this illustration: