


Authorized software settings in Advanced EPDR
Related Products_
- Advanced EPDR
Introduction
In Hardening and Lock modes of the advanced protection, Advanced EPDR prevents the execution of programs that are unknown by Advanced EPDR intelligence until they are classified. This situation may create delays for users, above all when the network administrator knows the source of the program and the reason why it has been blocked, for example:
- Specific niche programs with very few users.
- Programs that update automatically from the vendor’s website without user interaction.
- Programs whose functions are distributed across hundreds of libraries which are loaded in memory and therefore blocked as and when they are used by the user from program menus.
- Programs operating on a client-server model, where the client side is hosted on a shared network resource.
- Polymorphic software which dynamically generates executable files.
Authorized software and exclusions
In Advanced EPDR there are three features to prevent blocking of programs:
- Using excluded files and paths: prevents certain items or areas on the computer from being scanned. Unknown software won’t be prevented from running. This, however, could represent a security hole and is not recommended for use except where there are problems with the computer’s performance.
- Unblocking programs in the process of classification: temporarily allows blocked programs to run but with a reactive approach: the administrator cannot unblock a program unless it has first been blocked. As certain software can consist of several components, and each of them may have to be unblocked individually, the cycle of blocking and unblocking can take some time.
- Configuring authorized software: proactive unblocking of unknown programs in the process of classification. The administrator can assign settings for programs from a known source which can be used provided no risk is detected. This is the recommended method for unblocking programs.
Authorized software settings
Accessing the settings
- Click the Settings menu at the top of the console, then Authorized software in the side menu.
- Click Add to open the Add settings window.
Note: Authorized software settings can only be assigned to Windows servers or workstations.
Required permissions
| Permission | Access type |
| Configure Authorized software | Create, edit, delete, copy, or assign Authorized software settings. |
| View Authorized software settings | View the Authorized software settings. |
Authorized software module functions
Network users will be able to run unknown software which is in the process of classification as long as
the network administrator has permitted it by using an authorized software rule.
Once it has been analyzed, Advanced EPDR classifies the program (goodware or malware). If the
program represents a threat, it will be blocked regardless of whether it appears in the authorized
software settings.
Authorized software module settings
Authorized software settings consist of one or more rules, each of which refers to a single software
component or family of programs which Advanced EPDR will allow to run even though it has been
blocked because its classification is not yet known.
- Creating an authorized software rule
Click the “+” Authorize programs link to create a rule with the information shown below, and then click
Authorize:Field Description Name Rule name. MD5 MD5 hashes of the files AD360 will allow to run. Product name This is the Product name field from the header of the file to be unblocked. To get this value, right-click the program and select Properties, Details. File path Path of the program on the server or workstation. System environment variables are accepted. File name File name. Wildcards * and ? are accepted. File version This is the ‘Version’ field from the header of the file to be unblocked. To get this value, right-click the program and select Properties, Details. Signature This is the digital signature of the file. - Deleting an authorized software rule
- Click the trash icon to the right of the authorized software rule to delete.
- Click Save in the top right of the screen to save the newly edited authorized software settings.
- Editing an authorized software rule
- Click the name of the authorized software rule. The Authorize programs window appears.
- Edit the rule properties and click Authorize.
- Click Save in the top right of the screen. The authorized software settings will be updated.
Copying an authorized software rule
- Click the copy icon to the right of the authorized software rule to copy. The Authorize programs window appears. The Name contains the name of the rule with the prefix Copy of.
- Edit the rule properties and click Authorize.
- Click Save in the top right of the screen. The authorized software settings will be updated.
Calculating the MD5 of one or more files
There are many tools available to calculate the MD5 of a file. In this section, the PowerShell tool in
Windows 10 is used.
- Open the folder containing the files, click the File menu of the file explorer and click Open Windows PowerShell. A window with the command line appears.
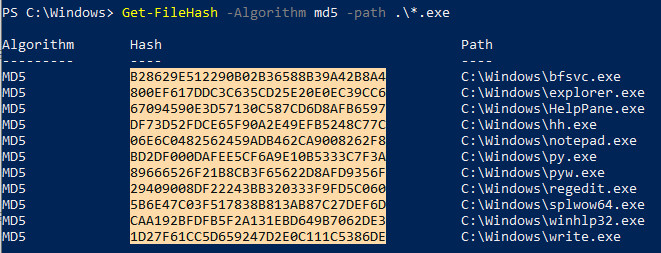
- Enter the following command and replace $file with the file path. Wildcards * and ? are accepted.
PS c:\folder> Get-FileHash -Algorithm md5 -path $files - To copy the MD5 hashes to the clipboard, press the key Alt and without releasing, select the hashes with the mouse pointer. Then press Control + c.
- To paste all the MD5 hashes from the clipboard to the Advanced EPDR console, click the MD5 field of the authorized software rule and press the keys Control + v.
- Click Authorize and then Save in the top right of the screen. The authorized software settings will be updated.
Getting the thumbprint of a signed program
- Right-click the file and select Properties from the context menu.
- In the Properties window, select the Digital signatures tab.
- In the Signature list, select the signature and click Details. The Digital signature details window appears.
- In the Digital signature details window, select the General tab and click View certificate. The Certificate window opens.
- In the Certificate path, click the Certification path tab and check that the final node of the certification path is selected.
- In the Certificate window, click the Details tab and select the field Thumbprint.
- Select the character string from the text box displayed and press the keys Control + c to copy it to the clipboard.
- Click the Signature field of the authorized software rule and press the keys Control + v to paste the thumbprint to the Advanced EPDR.
- Click Authorize and then Save in the top right of the screen. The authorized software settings will be updated.
