


How to install and configure Cytomic SIEM Connect ArcSight Connector v1.00.00?
Related Products_
- Cytomic SIEM Connect
Introduction_
This document contains all the information required to install and configure the Cytomic SIEM Connect ArcSight Connector. The purpose of this connector is to send the files that Cytomic Importer downloads from the Advanced cloud to the ArcSight SIEM server. These files log all the actions taken by the programs installed on the computers belonging to the customer’s IT infrastructure, and which are monitored by Advanced EPDR/EDR. The downloaded files will be stored in a folder on the computer and sent to the ArcSight SIEM server, which will interpret and automatically incorporate them into its database.
Installation requirements_
To successfully send the files downloaded by Cytomic Importer to the ArcSight SIEM server, the following requirements must be met:
- Install the Cytomic Importer program. Read this article to get the program and information on how to install and configure it.
- Install the ArcSight SmartConnector program on the same computer on which the Cytomic Importer program was installed, or on a computer capable of accessing the shared directories in which Cytomic Importer stores the information downloaded from the Cytomic cloud. Read this article for information on how to get the program and check this article for information on how to install and configure it.
- Download and unzip the connectorconfig-files.zip, This file contains the following two files:
- Agent.properties, with the environment basic settings.
- SiemImporter.sdkrfilereader.properties, with the correspondence between the fields in the log files downloaded by Cytomic Importer and the fields defined in the ArcSight SIEM server.
Installation and configuration_
To successfully install Cytomic SIEM Connect ArcSight Connector, a series of parameters must be specified for it to run correctly. Additionally, it is necessary to import the certificate that will ensure the encryption of the data to be transmitted between the computer with the ArcSight SmartConnector program installed and the ArcSight SIEM server.
Note: Before you start the process, see section Installation requirements. The screenshots displayed in this guide may not exactly match what you see in the version installed by your administrator.
To install the connector, follow the steps below:
- Install the ArcSight SmartConnector program. Refer to section Installation requirements for information on how to get the program and its installation guide.
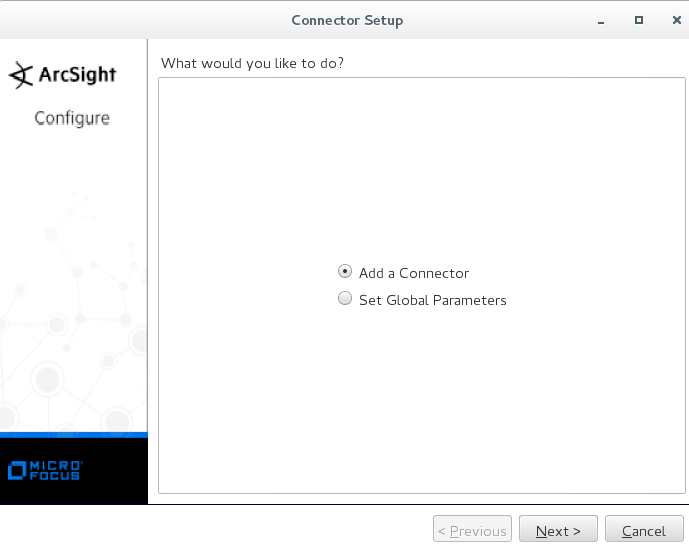
- When the process is complete, select Add a Connector and click Next.
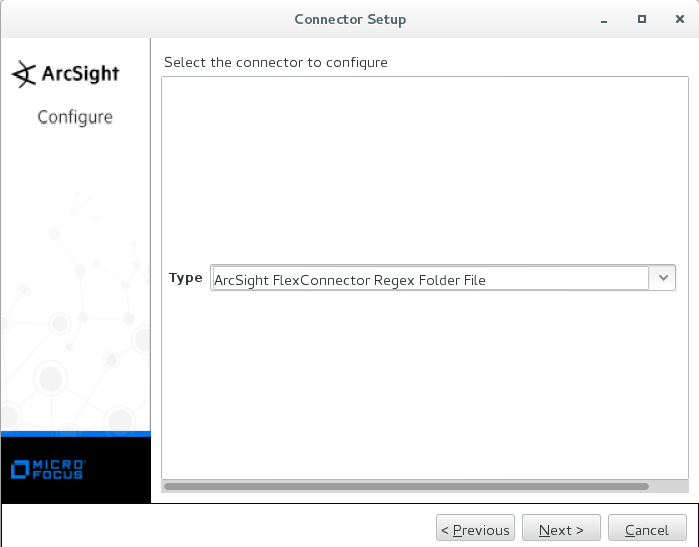
- For the connector to automatically send the files stored by Cytomic Importer in the chosen folder to the SIEM server, select ArcSight Flex Connector Regex Folder File from the Type drop-down menu. Then, click Next.
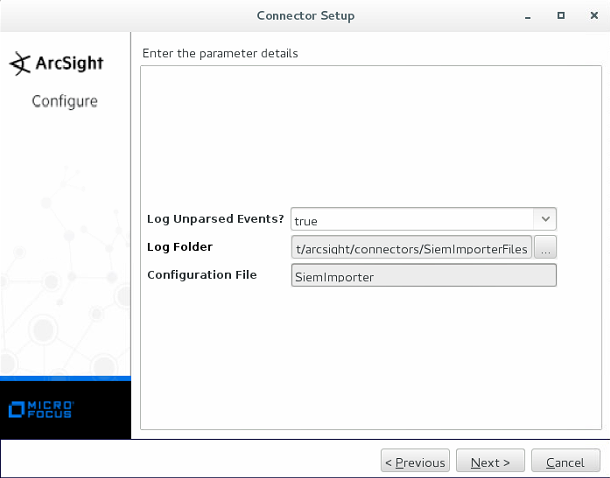
Configuring the connector parameters
- Complete the following fields:
- Log Unparsed Events: select True from the drop-down menu.
- Log Folder: enter the path where the files downloaded by Cytomic Importer are stored.
- Configuration File: Enter SiemImporter
- Copy the SiemImporter.sdkrfilereader.properties file that you previously downloaded, to the /opt/arcsight/connectors/SiemImporter/current/user/agent/flexagent directory and click Next.
Configuring the destination parameters
Enter the name or IP address of the computer that contains the ArcSight manager, as well as the user name and password, and click Next.
Describing the connector
Enter the required data for describing the connector (Name, Location, Device Location, Comment).
Importing the certificate
For the connector to work properly, it is necessary to import the certificate that ensures the encryption of the communication between the computer with the SmartConnector program installed and the computer that contains the ArcSight manager. To do this:
- Select the option to import the certificate and click Next.
- Verify the connector data is correct and click Next.
The connector installation is completed.
Configuring the connector as a service or as an application
Finally, select whether to install the connector as an application or as a service/daemon.
Click Next and then Exit to finish the process.
Final installation adjustments
For the connector to work properly, it is necessary to update a number of entries in the agent.properties file stored in /opt/arcsight/connectors/SiemImporter/current/user/agent/. To do so, copy the specified content to the file provided by Cytomic, which you previously downloaded. The entries to edit are as follows:
- agents[0].configfile
- agents[0].destination[0].xxx (all rows starting with agents[0].destination[0])
- agents[0].entityid
- agents[0].id
- agents[0].folder
Once all changes have been made, save the agent.properties file.
Installation requirements of products based on Cytomic Platform for Windows
Related Products_
- Cytomic EPDR
- Cytomic EDR
Supported Operating Systems_
Workstations
- Windows XP 32-bits SP3
- Windows Vista (32 and 64-bits)
- Windows 7 (32 and 64-bits)
- Windows 8 (32 and 64-bits)
- Windows 8.1 (32 and 64-bits)
- Windows 10 (32 and 64-bits)
Servers
- Windows 2003 (32, 64-bits and R2) SP2 and superiores
- Windows 2008 (32 and 64-bits) and 2008 R2
- Windows Small Business Server 2011, 2012
- Windows Server 2012 R2
- Windows Server 2016
- Windows Server 2019
- Windows Server Core 2008, 2008 R2, 2012 R2, 2016 and 2019
Hardware Requirements_
- Processor: CPU with x86 or x64 architecture and with support of at least SSE2
- RAM: 1 Gbyte
- Free space in disk for the installation: 650 Mbytes
Requirements for Windows Exchange Platforms_
Supported operating systems
- Exchange 2003: Windows Server 2003 32-bits SP2+ and Windows Server 2003 R2 32-bits
- Exchange 2007: Windows Server 2003 64-bits SP2+, Windows Server 2003 R2 64-bits, Windows 2008 64-bits and Windows 2008 R2
- Exchange 2010: Windows 2008 64-bits and Windows 2008 R2
- Exchange 2013: Windows Server 2012 y Windows Server 2012 R2
- Exchange 2016: Windows Server 2012, Windows Server 2012 R2 and Windows Server 2016.
- Exchange 2019: Windows Server 2012, Windows Server 2012 R2, Windows Server 2016 and Windows Server 2019.
Hardware and software requirements
The hardware requirements to install the protection on Exchange servers are the ones determined by the Exchange Server:
- Exchange 2003: http://technet.microsoft.com/es-es/library/cc164322(v=exchg.65).aspx
- Exchange 2007: http://technet.microsoft.com/es-es/library/aa996719(v=exchg.80).aspx
- Exchange 2010: http://technet.microsoft.com/es-es/library/aa996719(v=exchg.141).aspx
- Exchange 2013: http://technet.microsoft.com/es-es/library/aa996719(v=exchg.150).aspx
- Exchange 2016: https://technet.microsoft.com/es-es/library/aa996719(v=exchg.160).aspx
Exchange versions supported
- Microsoft Exchange Server 2003 Standard and Enterprise (SP1 / SP2)
- Microsoft Exchange Server 2007 Standard and Enterprise (SP0 / SP1 / SP2 / SP3)
- Microsoft Exchange Server 2007 included in Windows SBS 2008
- Microsoft Exchange Server 2010 Standard and Enterprise (SP0 / SP1 / SP2)
- Microsoft Exchange Server 2010 included and Windows SBS 2011
- Microsoft Exchange Server 2013 Standard and Enterprise
- Microsoft Exchange Server 2016 Standard and Enterprise
- Microsoft Exchange Server 2019 Standard and Enterprise
